 Owl Astro
The Seestar's LP filter: when to use it, and when not
The Seestar has a built-in filter that ZWO calls the light pollution (LP) filter. The name suggests you should switch it on whenever your sky is bright, and off when it’s dark. That’s not how it works, and using it that way can cost you a lot of signal.
What it actually is: a dual-band filter that only lets through two narrow slices of the spectrum, around hydrogen-alpha (Hα) and oxygen-III (OIII). On the Seestar S50 the Hα band is 20 nm wide and the OIII band 30 nm. Everything else is blocked.
Once you see it as a narrowband filter instead of a light-pollution filter, it becomes clear when to use it, and when not.
Key takeaways
- The LP filter is a dual-band Hα + OIII filter, not a filter that removes light pollution in general.
- Use it for emission nebulae, planetary nebulae and supernova remnants. Their light is concentrated in exactly those lines, so you keep almost all of it while the sky goes dark. That works under a bright sky, under the moon, and even under a dark sky.
- Don’t use it for galaxies, star clusters and reflection nebulae. Their light covers the whole spectrum, so the filter blocks most of their light as well as the sky’s. You gain nothing and need far more time.
- But it is useful for galaxies as an extra: a separate stack with the filter on lets you bring out the red Hα regions in galaxies like M33 and M82, on top of your normal colour data.
- The Seestar app chooses for you based on the target, and so does Owl Astro.
What the filter lets through
Every object sends us light with its own spectrum, and so does the sky.
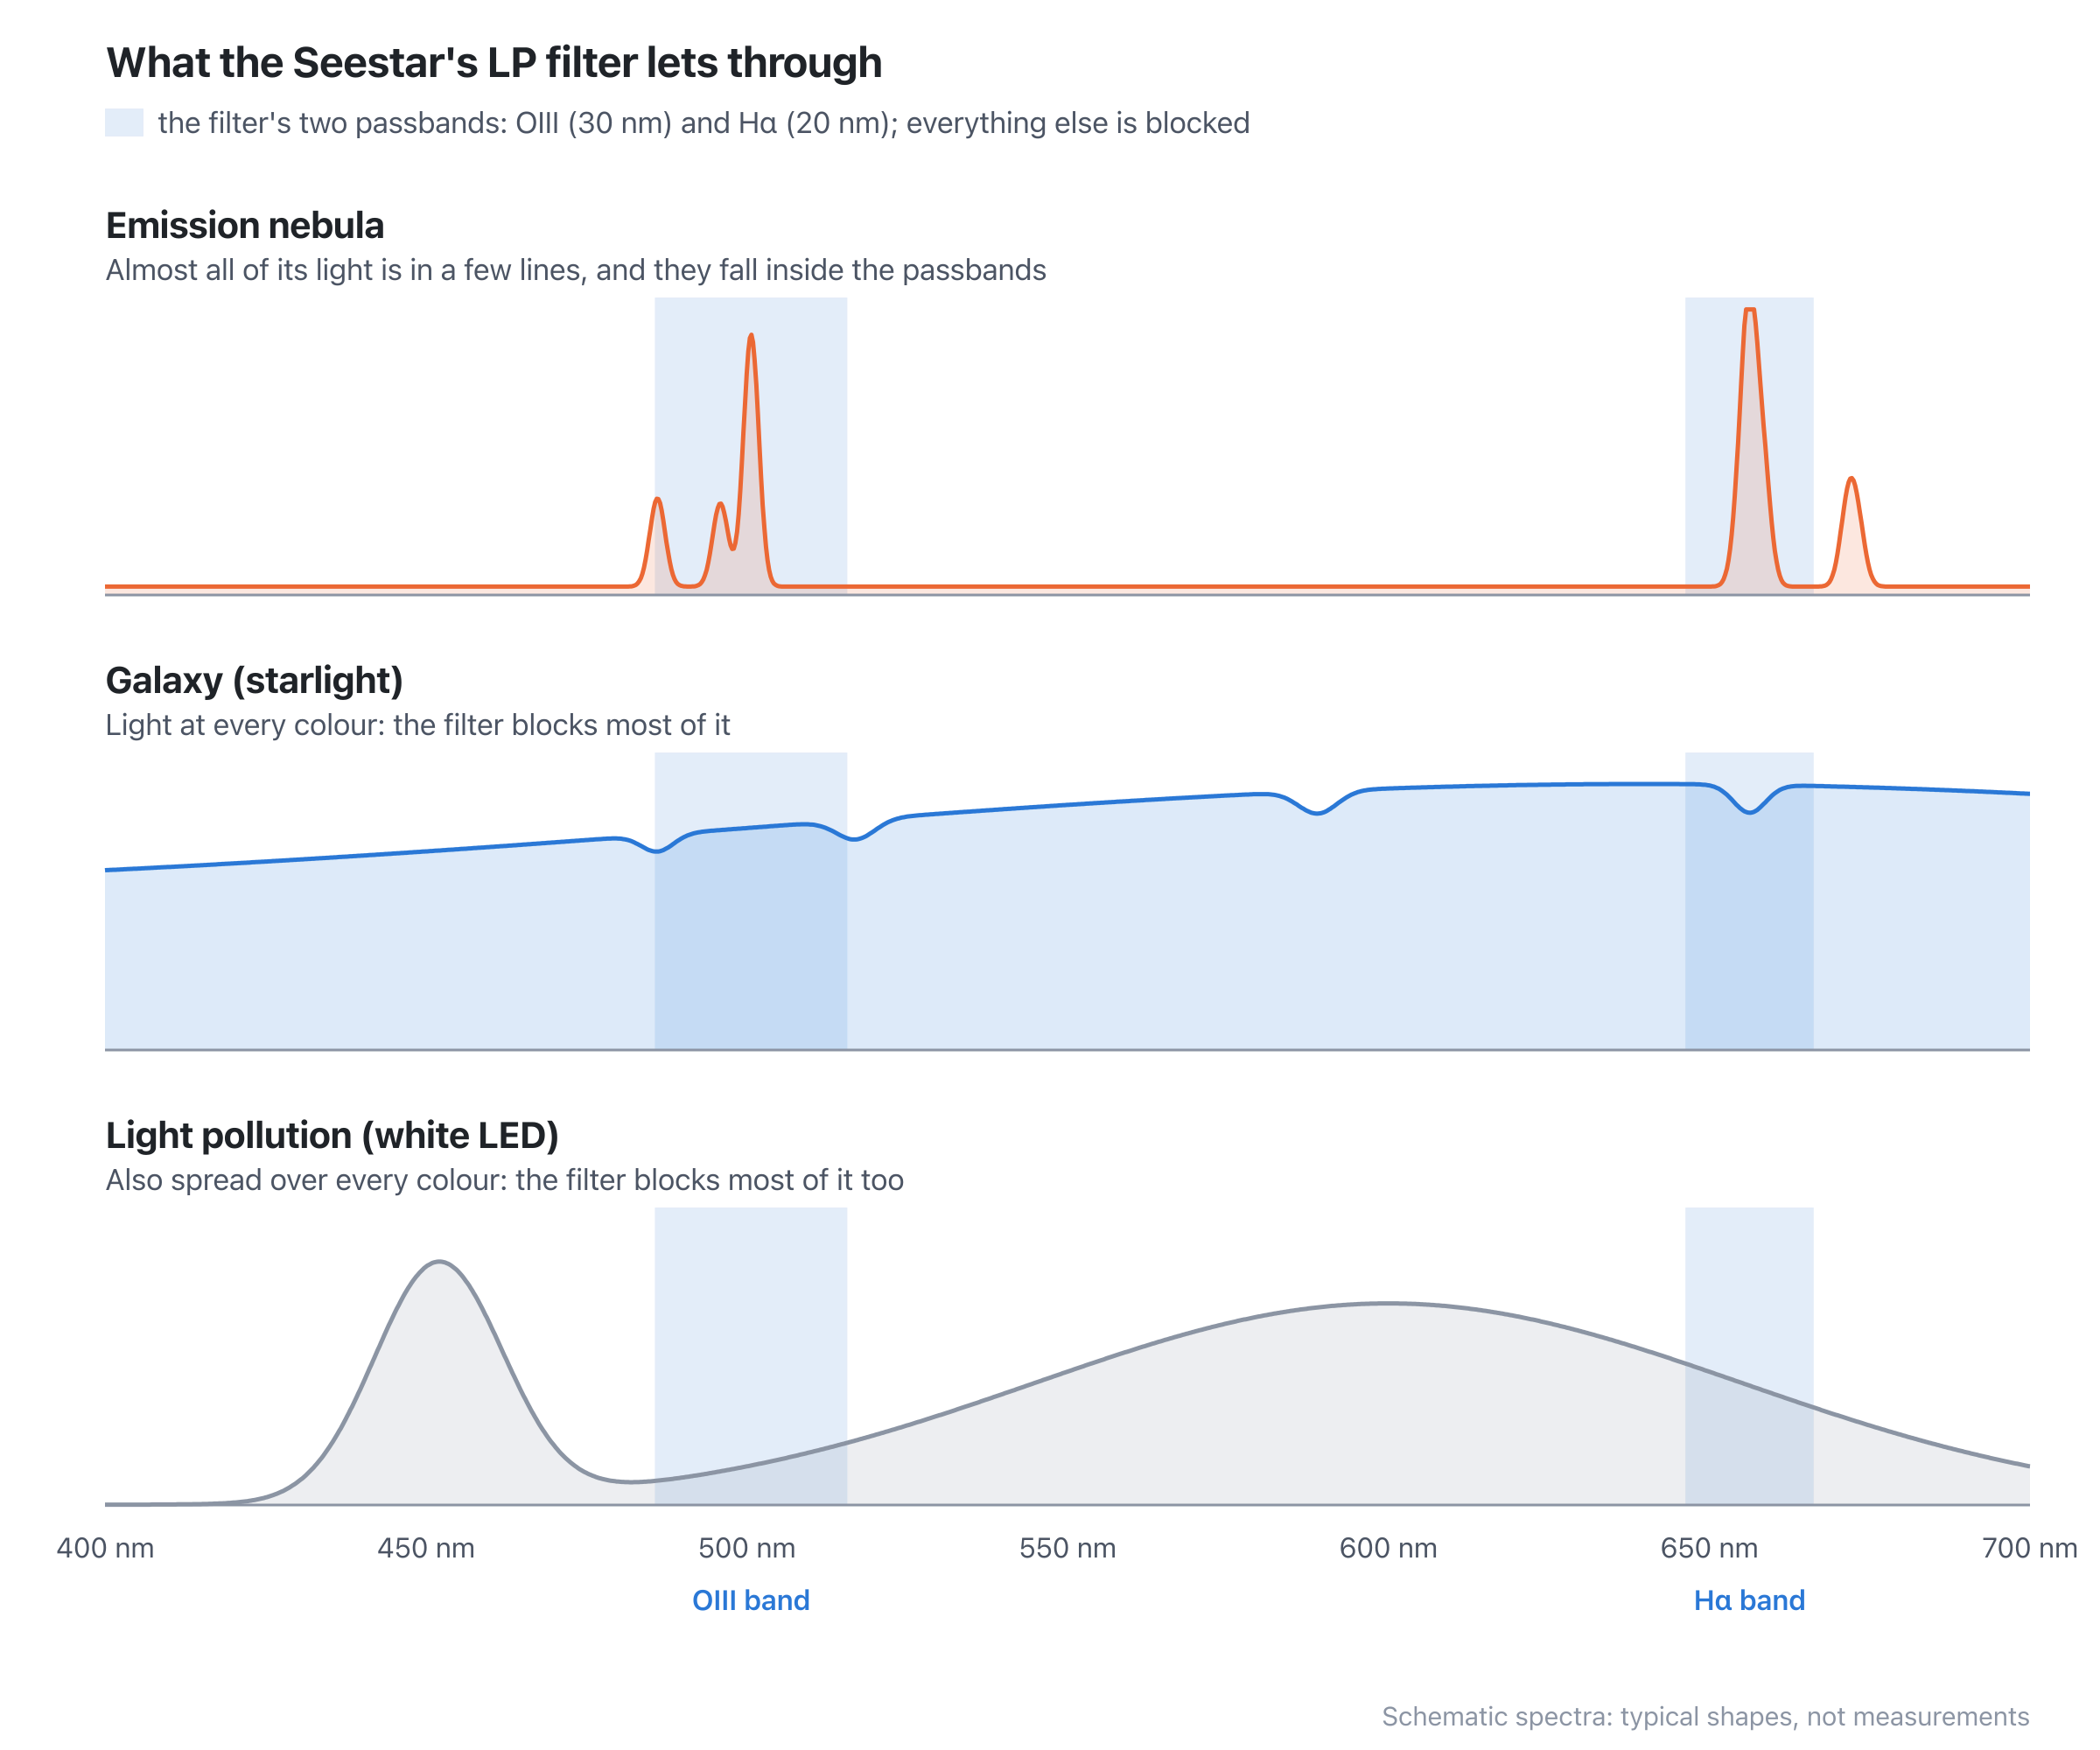
An emission nebula like the Orion Nebula, the Lagoon or the North America Nebula glows because its hydrogen and oxygen gas is excited by hot young stars. That gas doesn’t shine at every colour: it emits a few sharp spectral lines, with Hα at 656 nm and OIII at 501 nm among the strongest. Those are exactly the lines the filter is made for.
A galaxy shines with the light of billions of stars, and starlight covers the whole spectrum. Only a small part of it falls inside the two passbands.
Light pollution used to be mostly orange sodium light, which a filter could block quite neatly. Today it’s mostly white LED light, and that is spread over the whole spectrum too.
So what does the filter do? It blocks roughly nine tenths of a broadband sky. For an emission nebula, which keeps most of its light, that’s a huge gain in contrast. For a galaxy, which loses about as big a share of its light as the sky does, the contrast hardly improves, while there’s far less light to work with. Each sub collects only a fraction of the signal, so you need many times the integration time for the same result. That’s why the filter helps emission nebulae and hurts galaxies.
When to use it
Turn the LP filter on for:
- Emission nebulae (HII regions): the Orion Nebula (M42), the Lagoon (M8), the Eagle (M16), the Rosette, the North America and Pelican nebulae, the Heart and Soul.
- Planetary nebulae: the Ring Nebula (M57), the Dumbbell (M27), the Helix. Mostly OIII, with Hα.
- Supernova remnants: the Veil Nebula, the Crescent.
Note that this isn’t only for light-polluted skies. Under a dark sky the filter still makes the background much darker relative to the nebula, so you get more contrast for the same time. And it works under the moon too: moonlight is broadband, so the filter blocks most of it. On moonlit nights, emission nebulae with the LP filter are often your best option.
When not to use it
Turn the LP filter off for:
- Galaxies: M31, M51, M81, M101 and so on. Broadband starlight, as explained above.
- Star clusters: open and globular. Also broadband, and the filter changes the colours of the stars: they all come out red or teal.
- Reflection nebulae: like the blue nebula around the Pleiades (M45). These shine by reflecting starlight, so their spectrum is the stars’ spectrum. The filter blocks it.
- Dark nebulae: they’re only visible against the broadband light behind them.
- Comets: their light is partly reflected sunlight, and the filter cuts most of it.
Under a bright sky that means: shoot these without the filter, and make up for the light pollution with total integration time. As I showed in Longer exposures versus multiple shorter exposures, under a light-polluted sky integration time is what counts.
The best of both: adding Hα to a galaxy
Here it gets interesting. A galaxy isn’t only starlight. Spiral galaxies are full of star-forming regions: clouds of hydrogen lit up by young stars, which are small emission nebulae in their own right. And they glow in Hα.
In a normal colour image these HII regions are faint pink dots, drowned in the light of the stars around them. In an image taken through the LP filter, most of the starlight is gone and the HII regions stand out. Combine the two, and you get a galaxy in its natural colours with its star-forming regions glowing red.
Good targets for this:
- M33, the Triangulum Galaxy: full of HII regions, including NGC 604, one of the largest star-forming regions we know of.
- M82, the Cigar Galaxy: a starburst galaxy with red filaments of hydrogen streaming out from its centre, above and below the disk.
- M51, M101 and M31: all with chains of HII regions along their spiral arms.
Capturing the data
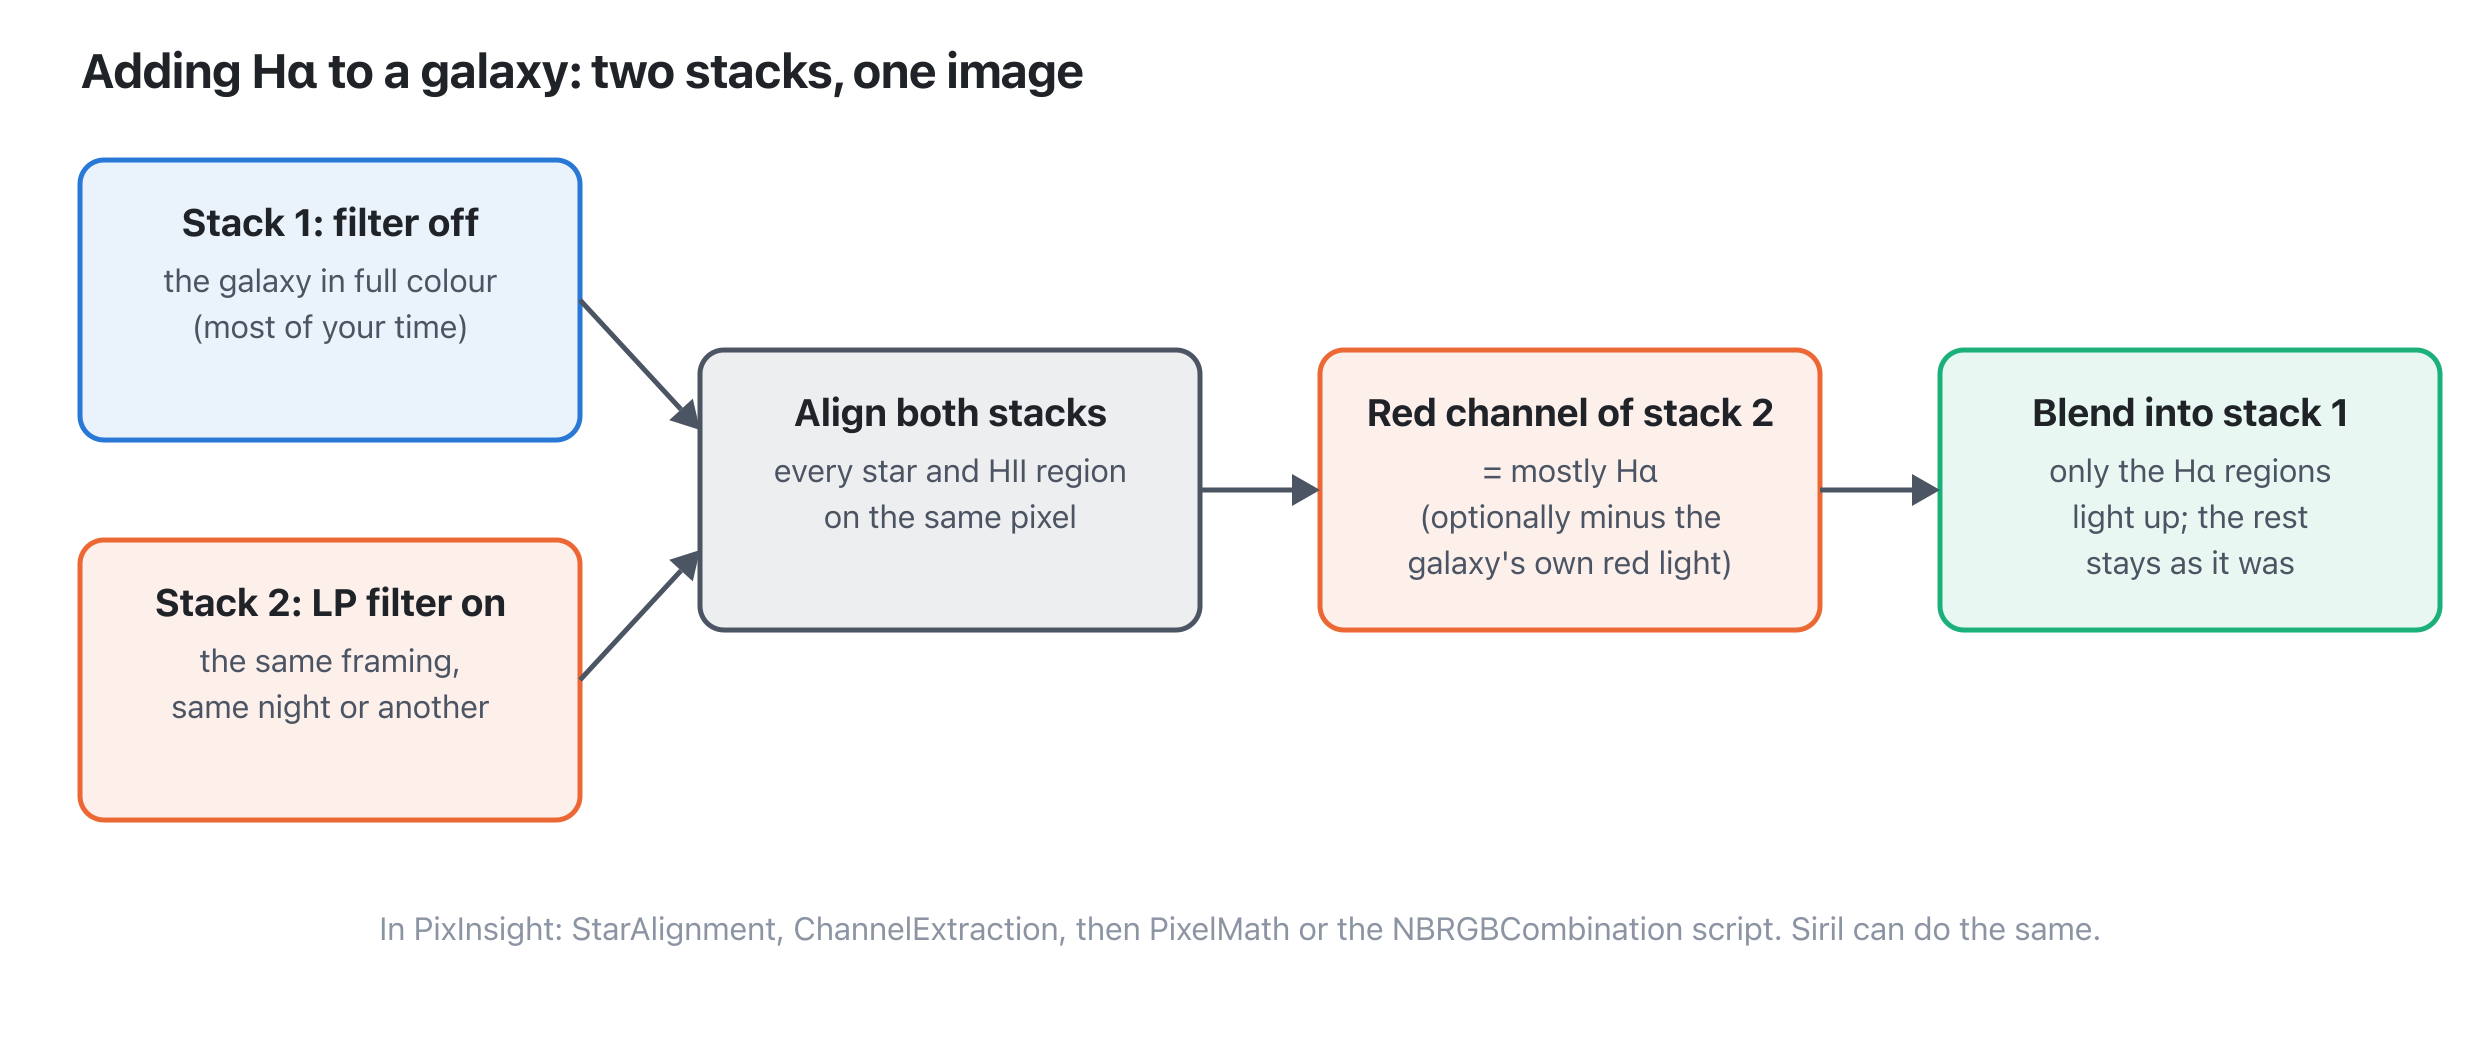
- Shoot the galaxy normally, with the filter off. This is your colour image, so put most of your time here.
- Shoot the same target again with the LP filter on. The Seestar app normally keeps the filter off for a galaxy, so switch it on yourself. Keep the framing the same. It can be the same night or another one.
- Give the filtered stack enough time. The filter blocks most of the light, and HII regions are faint. Plan on at least as much time with the filter as without; more is better.
- Download the stacked FITS files of both sessions.
Combining them
You need software that can align and blend images: PixInsight or Siril, for example. In PixInsight:
- Align the filtered stack to the colour stack with StarAlignment, so every star and HII region lands on the same pixel.
- Extract the red channel of the filtered stack with ChannelExtraction. Through the LP filter, red pixels only see the Hα band, so this channel is essentially an Hα image.
- Remove the galaxy’s own red light (optional, but better). The Hα image still contains some starlight from inside the 20 nm band. Subtract a scaled copy of the colour image’s red channel, so only the emission is left:
Choose so that the stars and the smooth disk of the galaxy (nearly) disappear, while the HII regions stay.
- Blend it into red. With PixelMath, add the clean Hα to the red channel of the colour image:
Start with around 0.3 to 0.5 and adjust to taste. Too much and the galaxy turns pink; just right and only the HII regions light up. PixInsight’s NBRGBCombination script does a similar blend, with a preview.
Do this on the linear (unstretched) data, before you stretch the image, and then continue processing as usual. See my basic PixInsight workflow for the rest.
A note on exposure time
With the filter on, the sky is roughly ten times fainter. That’s the point of the filter, but it also means read noise matters more again: short subs are more likely to be limited by read noise instead of sky noise. So emission nebulae through the LP filter benefit from longer subs, and that’s one of the situations where EQ mode on a smart scope pays off. See Alt-az versus equatorial for when that’s worth it.
Comments
Loading comments…