 Owl Astro
How to use EQ mode on a Seestar or Dwarf smart scope
Smart scopes track in alt-az out of the box, and for many nights that’s all you need. But both ZWO (Seestar) and DwarfLab (Dwarf) have added an equatorial (EQ) mode, which removes field rotation and unlocks longer subs. In Alt-az versus equatorial for astrophotography I explained what field rotation is and when it matters. This guide is about the practical side: how to set it up.
Key takeaways
- EQ mode means tilting the whole smart scope so its azimuth axis points at the celestial pole. You need a tripod head or wedge that tilts and can be fine-tuned.
- Make the connection stiff. A tilted scope hangs on one screw and twists it all night. Rubber rings between scope and plate help; a proper wedge is better.
- Set the tilt to your latitude, point the scope north (south in the southern hemisphere), and let the app’s polar alignment routine guide you to the final position.
- What you get: no field rotation, longer subs (up to 60 s on both the Seestar and the Dwarf 3) and an uncropped field.
- Worth it under dark skies, with narrowband filters, for targets passing high overhead and for long projects. Under bright skies with short subs, alt-az is usually fine.
What you need
The smart scope itself does the tracking; you only have to tilt it, so that the axis it turns around points at the celestial pole. That axis then makes an angle with the horizon equal to your latitude.
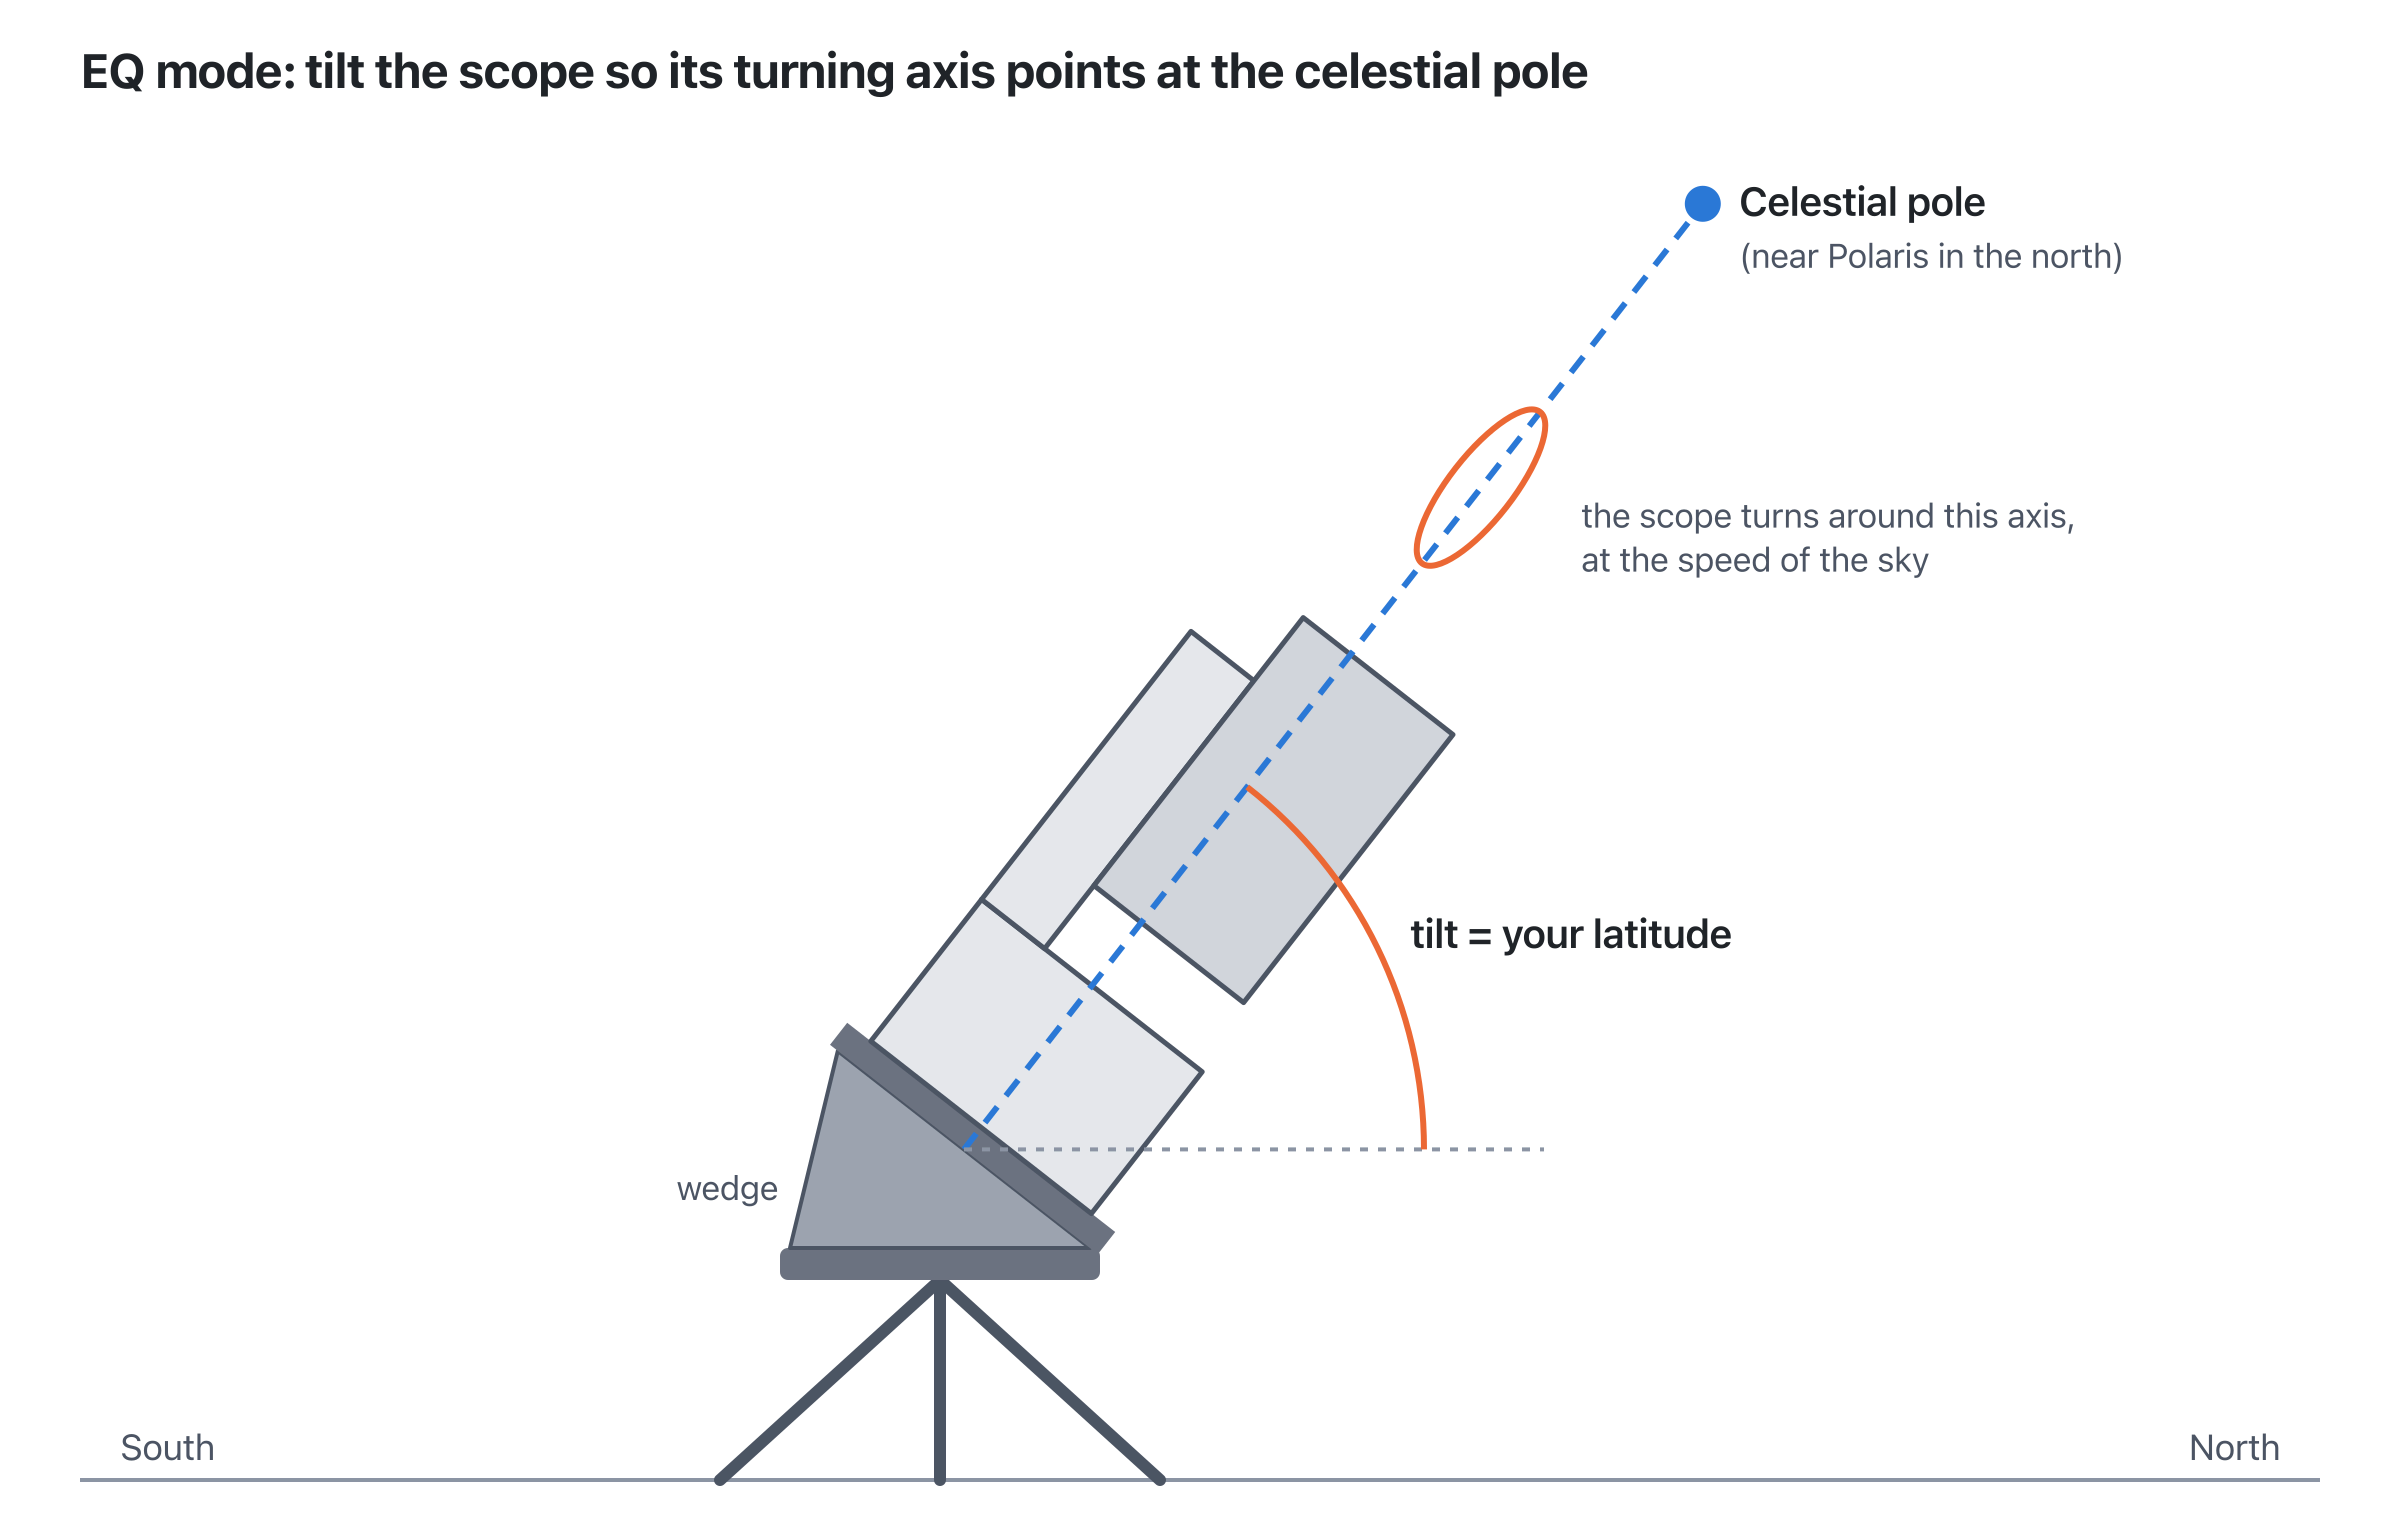
For that you need:
- A sturdy tripod. A tilted smart scope puts its weight off-centre. A flimsy photo tripod will shake in the wind and can even tip over.
- A tilting head with fine adjustment. You’ll be making small corrections in two directions during polar alignment:
- Seestar: ZWO recommends its TH10 tripod head (with the TC20 tripod), but an equatorial wedge with altitude and azimuth knobs works too. The Seestar has a 3/8” thread, so you may need a 3/8” to 1/4” adapter screw depending on the head.
- Dwarf 3: DwarfLab says you need a two-way head that moves left-right and up-down. A small equatorial wedge is the more comfortable option.
- A stiff, rigid connection between the scope and the head. More on that below, because it matters more than most people expect.
- A clear view of the sky, not necessarily of the pole. Both scopes measure the alignment by plate solving, so you don’t need to see Polaris (or Sigma Octantis in the south).
Why the connection has to be rigid
In alt-az mode a smart scope stands upright and its weight presses straight down on the head. In EQ mode it’s tilted, so all of its weight hangs sideways on a single 3/8” screw. And then the scope starts turning around that tilted axis all night, which puts a twisting force on exactly that connection.
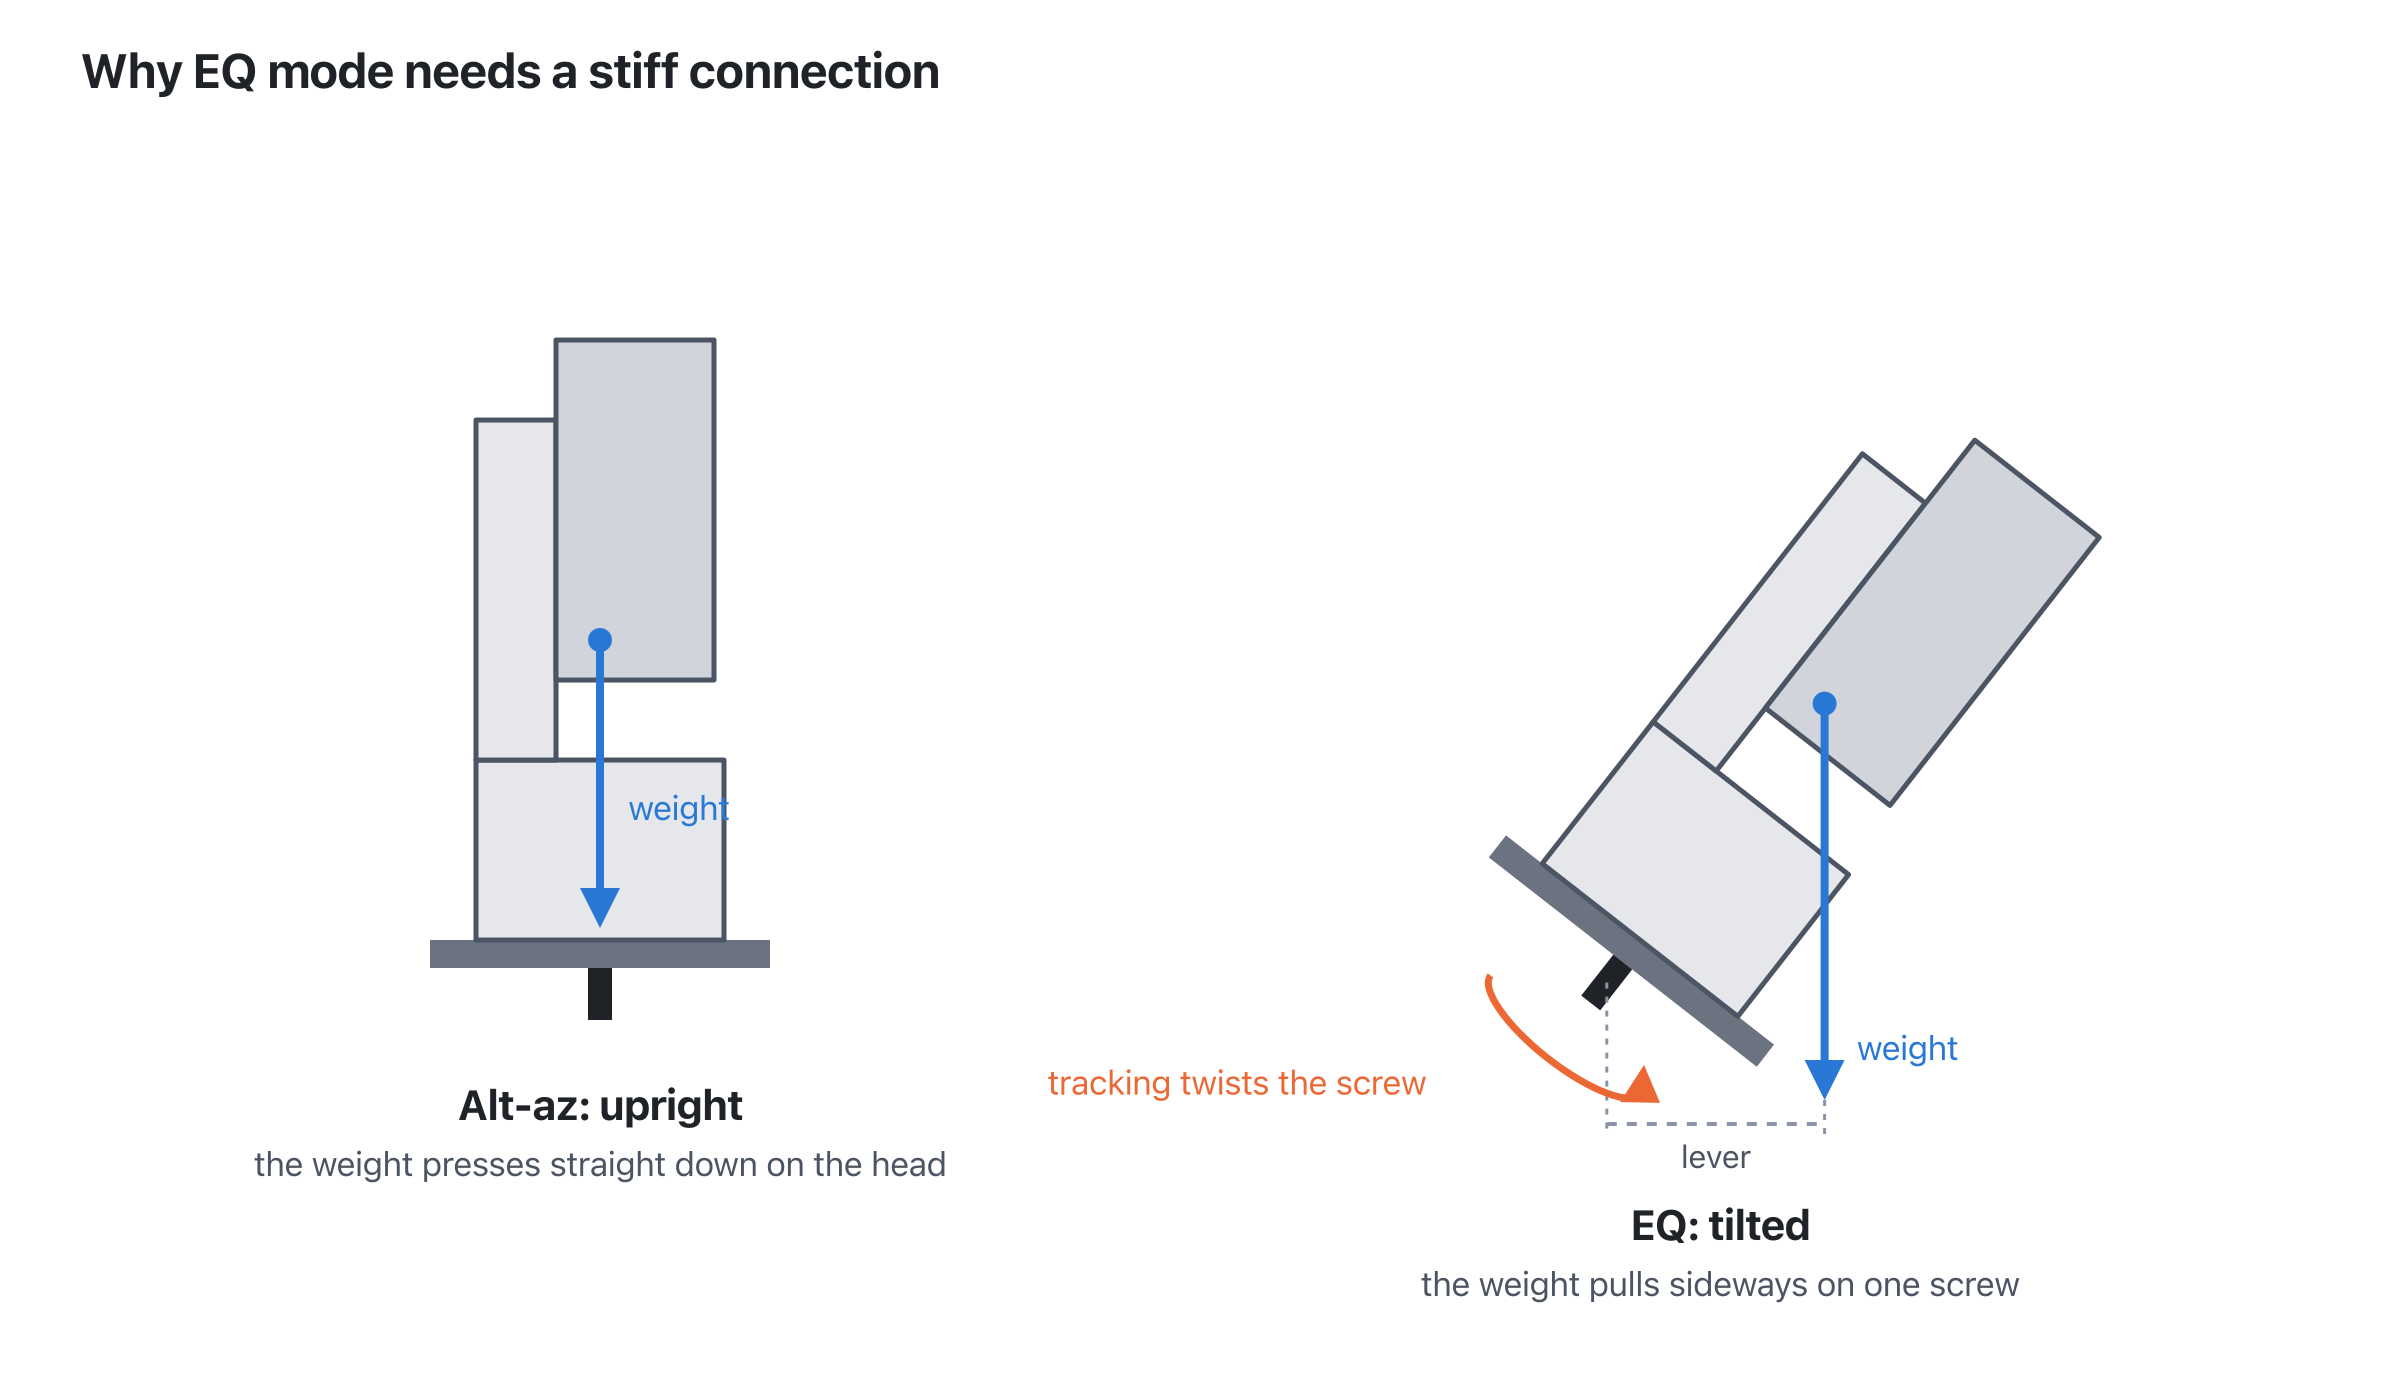
Any play there costs you:
- The polar alignment shifts. If the scope sags or twists even a little after you’ve aligned, you’re no longer pointing at the pole, and you’re back to drift and field rotation without knowing it.
- The scope can unscrew itself. The tracking motion slowly turns the scope on its screw. Seestar owners regularly report this in EQ mode: after an hour the alignment is off, or the scope has visibly rotated on its plate.
- Flex shows up in your stars. A wobbly connection moves with every slew, every gust of wind and every touch of the tripod, which means more rejected frames and less round stars, especially with 60 s subs.
So whatever you mount the scope on: tighten it well, check after alignment that nothing has moved, and make sure the scope can’t turn on its plate.
A cheap fix: rubber rings
The bottom of a smart scope and the top of a tripod plate are both smooth and hard, and they only touch at a few points (on the Seestar, the rubber feet). There’s very little friction to stop the scope from turning on its screw.
A simple fix is to put rubber rings between the scope and the plate: a few O-rings or a thick rubber washer around the screw, or a non-slip pad on the plate. The rubber gives grip, so the screw doesn’t have to do all the work, and the scope doesn’t creep. If the scope’s own rubber feet catch on the plate so that it doesn’t sit flat, add a (fender) washer to lift it clear, so it rests on the ring and the washer instead of rocking on its feet.
It’s cheap and it works, but it’s still one screw holding a tilted scope. If you use EQ mode a lot, a proper wedge is the better solution.
Why a ball head isn’t the best option
Most people start with the ball head they already have for their camera. It works, but it’s the hardest way to do EQ mode:
- One knob locks everything. A ball head holds all directions with a single clamp. Loosen it to correct the altitude, and the azimuth comes loose too. You can’t adjust one axis while keeping the other.
- The weight works against you. With a tilted scope on top, the ball tips over the moment you release the clamp. You end up holding the scope in place with one hand while tightening with the other.
- No fine adjustment. Polar alignment needs corrections of a fraction of a degree. With a ball head you nudge by hand, tighten, measure, and find you’ve overshot. It takes many rounds, and it’s frustrating.
- It shifts when you tighten it. Many ball heads move a little as the clamp closes, so the last correction is partly undone.
- It can creep during the night. A ball head holds its position by friction alone. A tilted load pulls on that clamp the whole time, and a slow sag means your alignment drifts while you image.
If a ball head is all you have, use a big, sturdy one, tighten it hard, and check the alignment again after the first half hour. A three-way or geared head is already a big step up, since each axis has its own control. But for regular EQ imaging, a wedge is the way to go.
Better: a real equatorial wedge
A wedge is made for exactly this job: carrying a tilted load and adjusting it in small, controlled steps. It’s much stiffer than a photo head, and the knobs let you move one axis at a time during polar alignment instead of nudging a ball head and hoping it stays put. Two popular options:
- Sky-Watcher Star Adventurer EQ wedge. Made for Sky-Watcher’s star tracker, but it works very well for smart scopes. Latitude is set with a geared knob, and it has a 3/8” socket, so the scope bolts on directly. Owners describe it as rock solid with a smart scope on top. It’s heavier and bulkier than a photo head, but that’s exactly why it’s stiff.
- Move Shoot Move (MSM) wedge for Seestar & Dwarf. Made specifically for smart scopes: CNC-machined aluminium, a tilt range from 0 to 60°, fine azimuth adjustment knobs and an Arca-Swiss plate, so it fits on most tripod heads. It’s light (about 320 g) and compact, which makes it a good travel option. Some owners find it needs a firm tightening to get rid of the last bit of play, so check it before each session.
Whichever you choose, put it on a sturdy tripod: a wedge is only as rigid as what’s under it.
Setting up a Seestar (S30, S50 and the Pro versions)
ZWO’s own guide describes these steps. Make sure the Seestar app and firmware are up to date first.
- Level the tripod with one leg pointing to true north (south in the southern hemisphere). Putting the scope above that leg keeps the weight over the tripod instead of beside it.
- Switch to EQ mode before you start. In the app, go to Profile → Advanced Features → Mount Mode and choose EQ Mode. ZWO recommends starting from the scope’s initial position: shut it down, restart it, then switch.
- Tilt the Seestar to your latitude. Mount it with the power indicator facing up, and tilt it until the angle shown in the app matches your latitude. Roughly aim it at true north (south in the southern hemisphere) and lock the tilt.
- Polar align. Tap Get Polar Align Deviation. The Seestar turns, takes images at a few positions and calculates how far its axis is from the pole, in azimuth and in altitude. Adjust the head’s knobs following the arrows, measure again, and repeat until both deviations are under 1°. A green Complete icon confirms it.
- Image as usual. Pick a target and start stacking. In EQ mode, a 60 s exposure option is added to the usual 10, 20 and 30 s.
Setting up a Dwarf 3
In EQ mode the Dwarf 3 can take exposures of up to 60 seconds.
- Set up the tripod and head so you can tilt the Dwarf without moving the legs. During alignment you only move the head: never the whole tripod.
- Start EQ mode in the app. In Astro mode, open the menu (the three dots) and choose EQ Mode. Finish focusing first, or choose to continue the EQ setup.
- Tilt the Dwarf. Its back faces north and its front (with the logo) faces south. Tilt the head backwards, by your latitude, so the top of the Dwarf points roughly at the celestial pole. (In the southern hemisphere, swap north and south.)
- Polar align. The Dwarf takes images at three positions and calculates the alignment error. Make the adjustments the app shows, and use Be More Precise to repeat until the error is as small as you can get it. DwarfLab’s guide aims for 1° or less; for the longest subs, the closer to 0 the better.
- Image as usual, now with longer exposures.
Tips
- Polar align as accurately as you can. The scope corrects for some error, but the better the alignment, the longer your subs can be before stars drift. It’s worth the extra minute.
- Check the tilt after locking it. Some heads sag a little when you tighten them. Measure again after the final adjustment, and once more after the first half hour of imaging: if the alignment has drifted, the connection isn’t rigid enough.
- Mind the weight. A tilted scope is more sensitive to wind and to bumping the tripod. Hang a bag under the tripod if you can.
- Don’t move the tripod after polar alignment, not even a little. If you do, align again.
- Start with 20 or 30 s subs. Longer subs give more signal per frame but also more chance of a frame being thrown out (wind, a satellite, a bump). Only go to 60 s if most frames are kept. And as I explained in Longer exposures versus multiple shorter exposures, under a light-polluted sky the longer subs gain you little anyway.
Is it worth the trouble?
That depends on your sky and your targets. Under a bright suburban sky, with 10 to 20 s subs, alt-az works fine and EQ mode mostly saves you some cropping. Under a dark sky, with a narrowband or dual-band filter, for targets that pass high overhead or when you put many hours into one target, EQ mode gives you clearly better data. See Alt-az versus equatorial for the details.
Sources
- ZWO: Equatorial mode guide and How to switch to EQ mode on the Seestar app
- Move Shoot Move: MSM wedge for Seestar & Dwarf
- Cloudy Nights: Seestar unscrewing itself in EQ mode and comparison of EQ wedge options for smart telescopes
- DwarfLab: DWARF 3 user manual and How to set up DWARF 3 for EQ mode in the southern hemisphere
Comments
Loading comments…