 Owl Astro
A basic DSLR processing workflow in PixInsight
First published on DSLR Astrophotography, revised for Owl Astro.
I use PixInsight for all my processing. Apart from occasionally removing defocus fringes around stars in Lightroom, for photos taken with regular lenses, it’s the only tool I use. Once I’d tried it and seen the first result, I never went back.
PixInsight has a steep learning curve, though, especially when you’ve just started with astrophotography. I get asked about my workflow a lot, so here’s my basic DSLR workflow.
2026 note: this workflow is from 2015, and PixInsight has changed since. The stages and their order still hold, but several tools have newer replacements. See What’s changed since 2015 at the end.
The best DSLR workflow in PixInsight?
Whenever someone asks me about my workflow, I answer: it depends. First, on the quality of your data. Second, on the object: a galaxy needs a different workflow than a wide field full of nebulosity. And last but certainly not least, on personal taste. One of the great things about PixInsight is that you can do things in many different ways, and which processes you use for your results comes down to preference, or just habit.
Still, some basic steps appear in every workflow, and they have to be done in a certain order. Let’s look at a basic workflow that contains them.
If you want to learn more about each step, I recommend the book Inside PixInsight by Warren Keller.
The four stages
Every time you process an image, you go through the same four stages, each with a few basic steps. Most steps are optional; the required ones are marked with an asterisk (*).
Before you start, make sure PixInsight opens your RAW files as pure raw data: in the Format Explorer, open the DSLR_RAW settings and choose Pure Raw.
- Preparing and combining your data
- The linear stage
- The stretch *
- The non-linear stage
1. Preparing and combining your data
This stage is about selecting and preparing the photos from your imaging session(s), and combining them into one stacked image.
a. Calibrating and debayering the RAW files
Calibration is optional, and if you’re just starting out I recommend skipping it. Taking flats, bias frames and darks is easy, but it adds a lot of complexity at first.
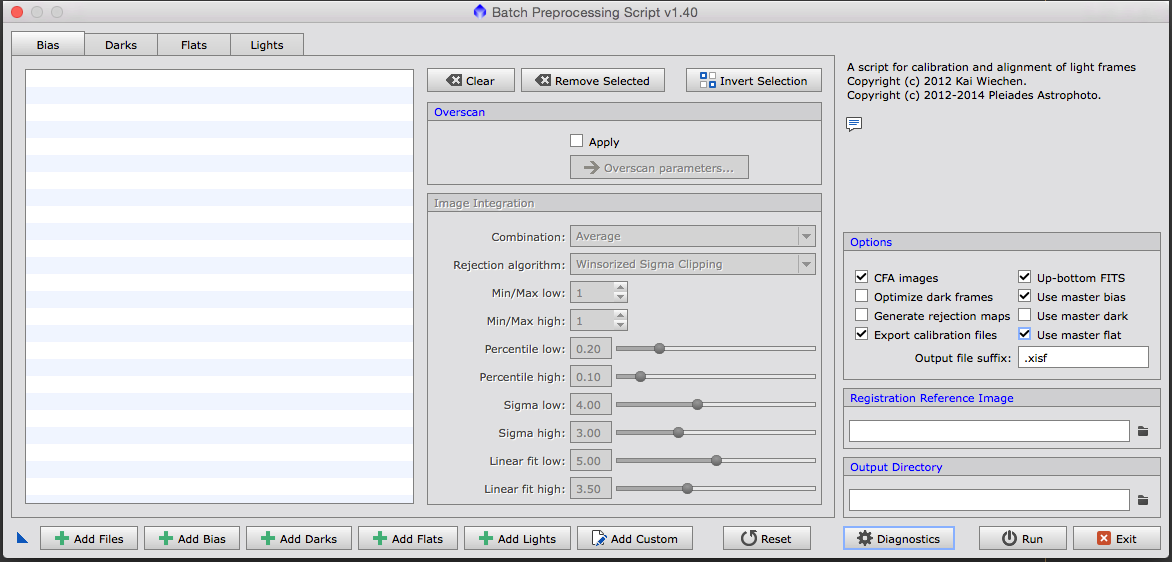
When you’re ready to add it, and want to use flats (recommended) and/or darks (personally not recommended), you need to calibrate not just your lights but also the flats and darks, with bias frames. And you need to do it on the RAW files before debayering, then debayer the calibrated files. That sounds complicated, but one script does it all in one go: BatchPreprocessing. Load all your frames, click Run and you’re done.
b. Selecting the light frames to use
Throw out the bad frames you don’t want in the final stack. A frame can be bad for many reasons: clouds, tracking or guiding errors, stray light, and so on. The Blink process lets you inspect many frames visually, very quickly.
I also highly recommend the SubframeSelector to have PixInsight measure all your frames. That way you can not only reject bad frames but also give each frame a weight in the final stack, so you make the most of your best frames.
c. Aligning the lights
This step is straightforward: use StarAlignment (under ImageRegistration in the Process menu) to align all your lights.
d. Stacking the lights into one image
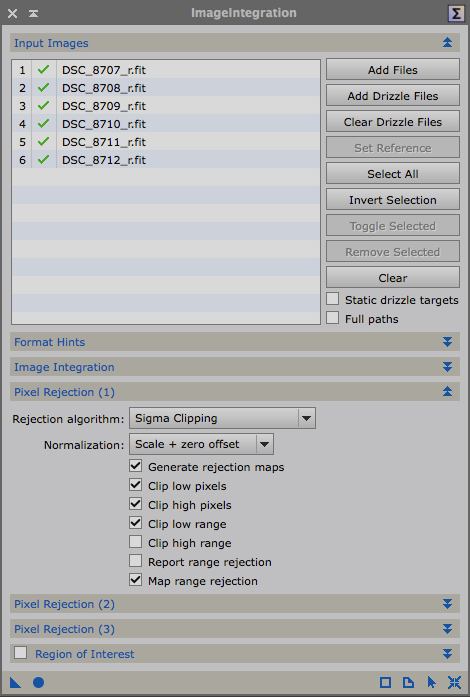
The ImageIntegration process combines all your aligned lights into one stacked image. There are many settings to tweak, but for now the defaults will do. Just make sure pixel rejection is on, with a rejection algorithm that removes hot pixels and some of the noise. Without going into the theory of each algorithm, use this rule of thumb:
- 5 to 12 frames: Sigma Clipping
- 13 to 20 frames: Winsorized Sigma Clipping
- more than 20 frames: Linear Fit Clipping
2. The linear stage
At this point the image is what we call linear. For now, remember that the image stays linear until you stretch its histogram. Some processes should be done while the image is still linear, which is why this matters.
The image will look very dark, or even completely black. To see what you’re doing without actually stretching it, PixInsight has the ScreenTransferFunction (STF). It shows you a preview of a stretched result, but remember that you’re still working on linear data!
The steps in the linear stage:
a. Cropping the dark edges
Because each light frame is aligned slightly differently, the stack often has thin black edges. There may also be other things you want to crop away: reflections, amp glow, strong gradients or vignetting. Do this first, so data you’re going to discard anyway can’t affect any of the following steps. Use DynamicCrop for the initial crop.
b. Correcting gradients, vignetting and other artefacts
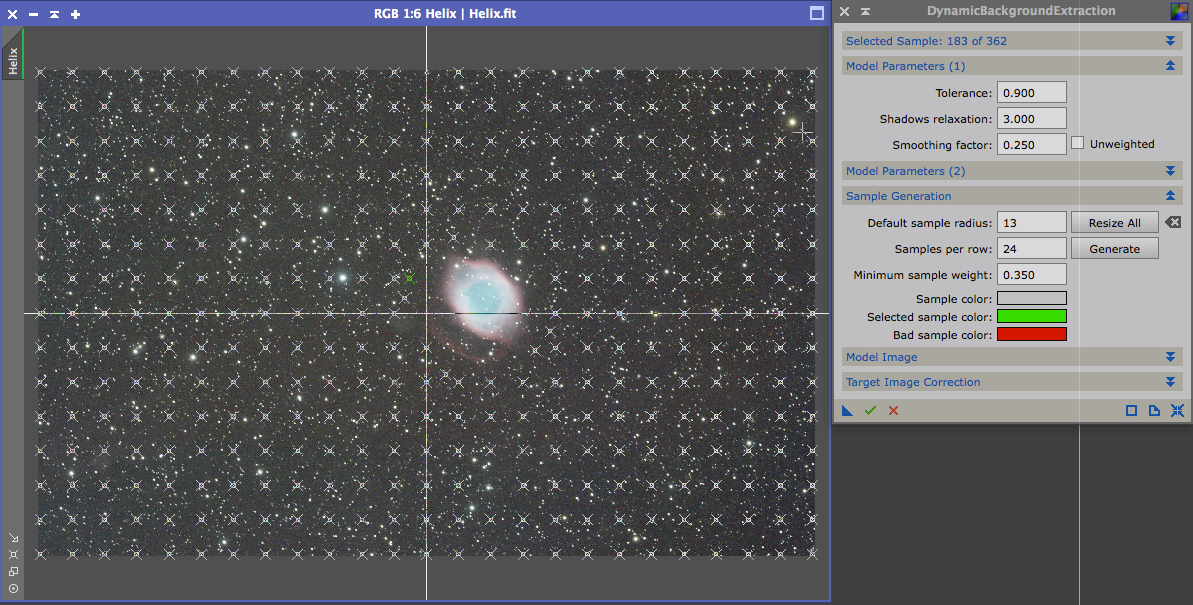
DynamicBackgroundExtraction (DBE) is a very powerful tool for correcting vignetting and background gradients.
I usually raise the tolerance to 0.9 and the minimum sample weight to 0.350, so that clicking Generate places samples over more of the image.
Choose Subtraction or Division as the correction method, depending on what you’re correcting: vignetting needs division, gradients benefit more from subtraction.
Always check the corrected image for new dark spots. They appear easily when a sample point mostly covers a star. Go back to DBE and move the sample points so they cover only background.
Don’t be afraid to run DBE more than once if you need to.
c. Colour balance and calibration
The initial colour balance can be way off, especially if you use a light-pollution filter. But even under truly dark skies the camera can give you the wrong balance. Fortunately that’s easy to correct in the linear stage with BackgroundNeutralization and ColorCalibration.
In my experience, depending on the data, BackgroundNeutralization alone can be enough. Create a preview over a (small) area that contains only background, and use it as the reference for BackgroundNeutralization. Then apply ColorCalibration.
After colour calibration, run SCNR once. It’s presented as a noise reduction process, but I see it more as colour correction: it removes a colour cast and normalises the colours (compare the histogram before and after). Usually you only apply it to green, because green hardly appears in deep-sky objects but is the colour of skyglow, which is why so many images have a green cast. You can run SCNR at almost any point, but I prefer to do it here, with the rest of the colour work.
d. Deconvolution (advanced)
Skip this step if you’re a beginner. Deconvolution tries to undo the blurring caused by the turbulent atmosphere and imperfections in your optics. First you build a model of that blurring (a PSF) with DynamicPSF, then you use it in the Deconvolution process. PixInsight’s own tutorial explains it in detail: Deconvolution and noise reduction example with M81 and M82.
e. Noise reduction
MultiscaleLinearTransform is very good at reducing noise at different scales. The same tutorial covers how to use it. Save the settings you end up with as a process icon: in my experience they work well in almost any situation.
Note that all steps in the linear stage are optional. Usually you’ll do some or all of them, but I did none of them for my wide-field image of the Pipe nebula, for example. That’s a wide field of the Milky Way with a lot of signal and hardly any plain background, and the data was very good.
3. The stretch *
I treat the stretch as a separate stage, because going from linear to non-linear is crucial for a good result with small, colourful stars. I stretch in three steps.
a. MaskedStretch for the initial stretch
The MaskedStretch process stretches your image over many iterations while masking the stars. That keeps (most) stars from ending up as blown-out white spots, or even blobs.
Try different settings for different images, but most of the time I use 75 iterations and a target median of 0.12.
b. Histogram stretch per channel, for the rest of the stretch and the final colour balance
After MaskedStretch you’ll probably see a bright white image and think something went wrong. Remember the ScreenTransferFunction! It’s most likely still active, applying the same preview stretch to an image that is now stretched for real. Turn off the STF and you’ll see the actual result. Most likely it still needs a bit more stretch, and maybe a slight colour adjustment.
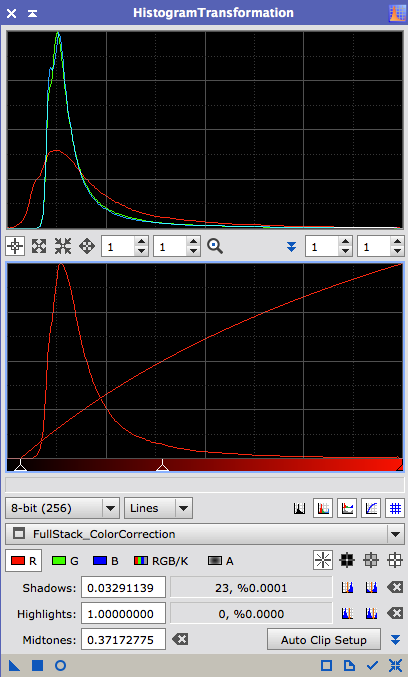
Now use HistogramTransformation to adjust each channel separately. In most cases the colour balance is good when the histograms of the three channels line up. For each channel:
- Move the shadows (left) marker to the right until pixels start to clip.
- Move the midtones (middle) marker to the left until the peak of the histogram roughly lines up with the first vertical grid line in the top graph.
Repeat for every channel, and try to match the curves in position and width. Use the real-time preview to see the effect and to avoid overstretching.
c. Curves for the initial contrast
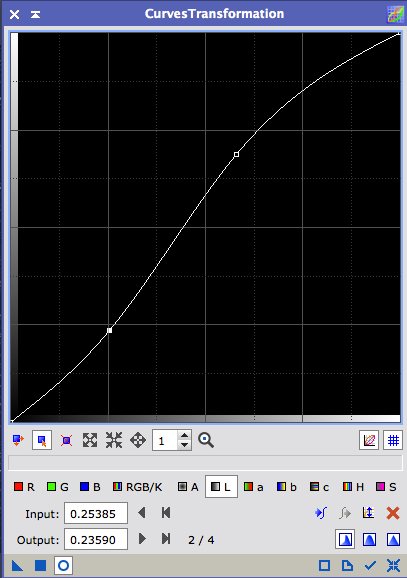
If you were careful, the image still needs a bit more stretch. Now I use CurvesTransformation to stretch further and add some initial saturation. I always apply contrast curves to the lightness (the L button). In general, you increase contrast with an S-shaped curve.
This is still the rough adjustment of contrast and saturation. For the final tweaks and details, always use masks so you only change the parts of the image you want. (In many galaxy images, for example, you don’t want to saturate the background: there’s only noise there.)
4. The non-linear stage
After the stretch, the image is no longer linear. In this stage we take the last steps towards the final image. Almost every step here uses (different) masks. One of the things that will improve your results most is learning to make an excellent mask for each step, and that’s certainly not easy.
My most common steps in this stage:
a. Improving dynamic range
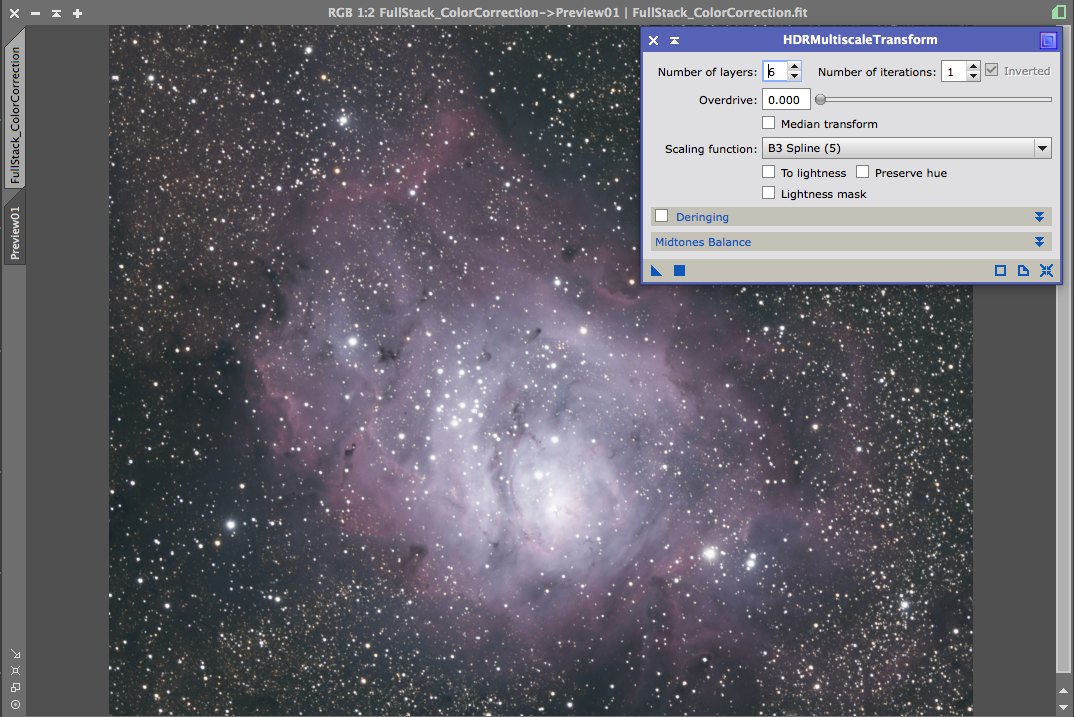
Often some parts of the image are much brighter than others. The best-known example is probably the core of M42, but you’ll see it in the cores of many galaxies, and in the centre of emission nebulae like the Lagoon. To bring out detail in those bright areas, use HDRMultiscaleTransform. Use a good mask to protect bright stars and other parts of the image: a star mask with large-scale structures turned up, or a more complete luminance or range mask.
b. Sharpening
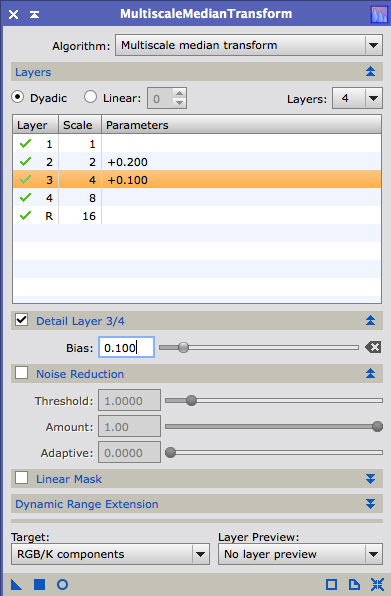
There are several ways to sharpen the important details. I always use MultiscaleMedianTransform: you sharpen by raising the bias of individual detail layers. Be very careful, because it easily turns harsh and overprocessed.
Always use a mask, so you don’t sharpen (and amplify) the noise in the background. RangeSelection can make one, but an easier option with very subtle results is to extract the luminance of the image and use it as a mask, as it is or after boosting it with curves. That will also sharpen the stars, so it’s better to refine the mask further. I do that in one of two ways: subtract a StarMask from the luminance with PixelMath, or remove the stars from the luminance with a very strong MorphologicalTransformation and clone-stamp out what’s left.
c. Reducing stars
A crucial step that’s often overlooked! In most images the stars aren’t the main subject (star clusters and globular clusters aside). But stars are the brightest things in the image, so they draw attention away from your subject, and the image often doesn’t feel balanced because of it. So I always soften and shrink the stars to balance the image. You’ll be surprised what a difference it can make.
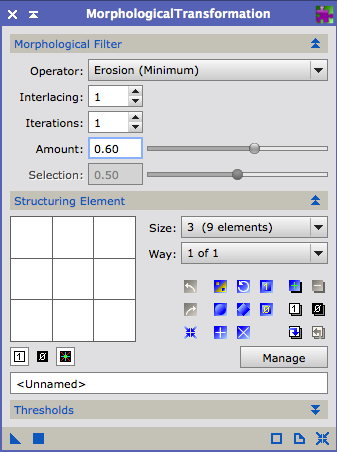
You need a good StarMask to protect the rest of the image. Then apply MorphologicalTransformation to the stars, very gently. I always start with one iteration, amount 0.60 and the smallest structure size, 3 (9 elements). Apply it, check the result, and judge whether you need more and how much the image can take. It’s easy to go too far and make the image look unnatural.
d. Final curves for colour and contrast
The last step is usually several rounds of CurvesTransformation, tweaking different parts of the image with different masks to bring out colour and balance the whole image.
This is another step people overlook, I think: CurvesTransformation is often used too broadly. Experiment a lot, and see what happens when you raise very specific parts of the curve. Precise tweaks can be what makes a faint nebula stand out from the background.
Noise reduction is often done in this stage too, but I almost never like the result: the background gets a blotchy structure of differently coloured patches, a sure sign of pushing the data too far. I think you’re better off with a bit of fine-grained noise, which is less noticeable. So I almost never do more noise reduction in the non-linear stage.
That’s it: the most basic PixInsight workflow for DSLR astrophotography I can come up with.
What’s changed since 2015
The stages and their order above still hold, but PixInsight has gained better tools for several steps:
- Calibration: WeightedBatchPreprocessing (WBPP) has replaced BatchPreprocessing. It calibrates, debayers, measures and weights your subs, aligns them and stacks them, so it covers most of stage 1 in one go.
- Frame selection: SubframeSelector is now a regular process rather than a script, and WBPP can use its weights automatically.
- Pixel rejection: for large stacks, Generalized Extreme Studentized Deviate (ESD) rejection is now a common choice.
- Colour calibration: SpectrophotometricColorCalibration (SPCC) calibrates colour against star catalogue data and your camera’s and filters’ response curves. It’s more accurate than plain ColorCalibration.
- Gradients: GradientCorrection and the AutomaticBackgroundExtractor are alternatives to DBE for simple gradients, though DBE is still the most flexible.
- Third-party tools: many imagers now use RC Astro’s BlurXTerminator (deconvolution), NoiseXTerminator (noise reduction) and StarXTerminator (separating stars from the rest of the image, which makes star reduction much easier). They’re paid plug-ins, not part of PixInsight.