 Owl Astro
Imaging the Pleiades properly
First published on DSLR Astrophotography, revised for Owl Astro.
Every autumn and winter, lots of telescopes and lenses point at the Pleiades, M45. Maybe it appeals because it’s so bright and easy to see with the naked eye. It looks like an easy target, but the stars are very bright and the surrounding nebulosity is faint, which makes it quite a challenge to capture and especially to process well. Even more so under light pollution.
Dynamic range and colour in the stars
I don’t think I’m exaggerating when I say that 95% of Pleiades images fail to show the dynamic range of this field. Instead we usually see a pitch-black (clipped) background with blown-out, white stars. And that’s when the colour is right: a blue cast over the whole image is common too.
That’s a shame, because there’s a lot of colour in the stars around the Pleiades. Capturing and processing it properly makes a huge difference to the result. Look up some of the best Pleiades images, by photographers such as Roberto Colombari, and you’ll see how colourful this region really is: stars in many different colours, and many colours and tones in the reflection nebula and the dust around it. It’s an excellent example of how much good stars contribute to the quality and appeal of an image.
Tips for imaging the Pleiades
1. Focus, focus and refocus
Bloated, blown-out stars are often (partly) caused by inaccurate focus, or by not refocusing as the temperature changes. Focus carefully, and refocus when the temperature drops. Depending on your scope, focus can also shift as the angle of the telescope and focuser changes during the night.
2. Pick the right ISO
Many people still choose an ISO that’s far too high. With the Pleiades especially, choose your ISO carefully to keep as much dynamic range as possible and stop stars from bloating and clipping in the camera already.
3. Choose your exposure time carefully
This field is tricky: the main stars clip even in very short exposures, while the nebulosity and dust are hard to pick up. Trust the power of stacking, and don’t worry if you hardly see any dust or nebulosity (or none at all) in a single frame. Get plenty of frames and pick the exposure time based on your conditions and the time you have on the target. I’d aim for at least 25 frames, and recommend 40 or more. See Longer exposures versus multiple shorter exposures for how sub length and total integration time trade off.
4. Use different exposure times
High dynamic range targets like the Pleiades benefit a lot from combining different exposure times into an HDR image: the long exposures capture the nebulosity and dust, the short ones the stars. PixInsight’s HDRComposition process does this very well.
5. Get the colours right
Remarkably many Pleiades images have incorrect colour calibration, which shows in the background: it’s often blue. Maybe because we know the reflection nebula is bluish, and people try too hard to make the blue show. Colour in astrophotography is quite subjective, but one thing we do know: the background shouldn’t be blue.
6. Go easy on the contrast
Be subtle in processing, and make sure you don’t clip the background (and more stars) when you add contrast to bring out detail in the reflection nebula. If you do want more contrast, use masks so you apply it locally, where the image benefits most.
7. Protect the stars in processing
This is a tricky target to process, which makes it a good one to learn from, but maybe also a frustrating one. Take all the basic steps for preserving stars. In PixInsight, for example, use MaskedStretch for the initial stretch (see my basic PixInsight workflow).
Use good star masks, and stretch and saturate the stars separately from the rest of the image. Don’t be afraid to push the saturation of the stars to see whether, and how much, colour is there: it might not be obvious at first that you captured it.
8. Shrink the stars with MorphologicalTransformation
One way to make the dust and nebulosity stand out more is to make the stars less prominent by shrinking them with MorphologicalTransformation. Afterwards you can usually stretch a bit more to bring out the nebulosity.
9. Use precise curves to bring out the dust
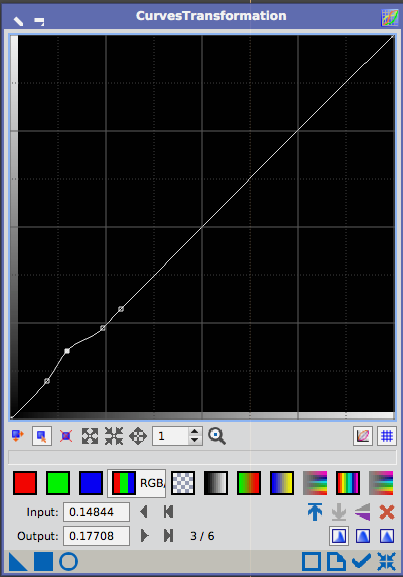
With a precise curves adjustment like this one, a small lift just above the background level, you can target the dust quite specifically and make it stand out a little more.
Good luck capturing this amazing object and its surroundings!