 Owl Astro
What is the best ISO for your DSLR for astrophotography?
First published on DSLR Astrophotography, revised for Owl Astro.
ISO is probably the most misunderstood setting on a DSLR, and people don’t agree on the best value for astrophotography. I’ve seen articles recommend anything from ISO 100 to ISO 3200 for exactly the same camera. That’s unfortunate, because the right setting can make quite a difference to your result.
Much of the confusion comes from the fact that the way ISO works on a digital camera is counter-intuitive, and people have trouble accepting it. Once you see how it works, though, I think we can all agree on the best ISO for a given model. Let’s take a detailed look.
The ISO setting does not change how sensitive your camera is to light.
Key takeaways
- ISO doesn’t change the sensor’s sensitivity. It sets how much the signal is amplified after the light has been captured.
- Raising the ISO lowers read noise, up to a point. Beyond that point you gain nothing, and you only lose dynamic range.
- The best ISO is the lowest ISO where read noise stops improving (or where the camera switches to digital amplification, whichever comes first). It differs hugely between models: around ISO 1600 for a Canon 6D, but ISO 100 to 200 for a Nikon D7000.
- Use full ISO stops (100, 200, 400, 800, 1600…), never the 1/3 stops in between.
ISO misunderstood
In daytime photography we learn about the exposure triangle: ISO, aperture and exposure time. The three are connected. Go from f/2.8 to f/4 and you need to double the exposure time to get the same exposure, or double the ISO and keep the exposure time. Raise one, and you can lower another to get the same result. Or so we’re told.
Almost every explanation defines ISO as the light sensitivity of the sensor: higher ISO, more sensitive sensor. Hold on. Does that make sense?
In the days of film it did: higher-ISO film used larger grains and really was more sensitive. But how would that work for a digital sensor? Do the pixels get bigger when you raise the ISO? Of course not. So how does the ISO setting make the sensor more sensitive to light?
It doesn’t. It really doesn’t. Raising the ISO doesn’t make your camera collect more light. It doesn’t change your sensor and it doesn’t increase sensitivity.
So what does it do? The ISO setting sets the amplification the camera applies to the signal, the number of electrons that photons freed in each pixel. Your pixels never collect more photons at a higher ISO; the signal is just amplified more. Cameras amplify in two ways, analog and digital, and that difference is the key to choosing the best ISO for astrophotography.
ISO and read noise
Raise the ISO and the noise in the image increases. That’s still true, even though sensors keep getting better. But it’s important to understand which noise it is: read noise. Read noise is complicated, but you can think of it as the noise the camera’s electronics add when they read out the sensor. It doesn’t depend on exposure time: a long exposure has the same read noise as a very short one, which is (partly) why longer exposures improve your signal-to-noise ratio (SNR). See Longer exposures versus multiple shorter exposures for how that works out.
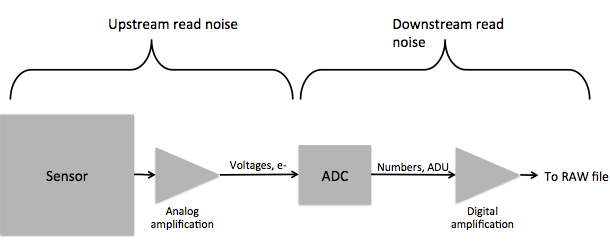
Reviews and sensor tests often say read noise depends on ISO. To understand why, we need to look one step further.
Read noise has two parts: upstream and downstream noise. Upstream noise is everything added by the electronics before the analog-to-digital converter (ADC). Downstream noise is everything from that point on, including the noise of the ADC itself.
The ISO setting controls the (analog) amplification of the sensor’s output. So the signal and the upstream noise are amplified together, while the downstream noise stays the same. Relative to the signal, the downstream noise shrinks: we gain SNR! So should we choose very high ISOs? Not so fast.
There’s a limit to what you gain, set by the downstream noise. Once the amplified upstream noise is large enough, it swamps the downstream noise and the downstream noise becomes irrelevant. Past that point, read noise grows in step with the signal: double the signal and you double the noise. That’s what people call “ISO-less”: raising the ISO gains you nothing, and you could just as well brighten the image in processing. In fact, that’s better for dynamic range, as we’ll see next.
This is a simplification, but it’s enough for our purposes. For the full maths, I recommend Emil Martinec’s Noise, dynamic range and bit depth in digital SLRs.
ISO and dynamic range
There’s another important effect of ISO: on dynamic range. Dynamic range is how well a camera can record the light levels between the darkest and the brightest parts of an image. It’s set mostly by how many electrons a pixel can hold, its full well capacity. Think of pixels as buckets catching rain: a bucket that holds 1,000 drops records more information than one that holds 100.
Dynamic range is also limited by the ADC: how many bits it has to turn the charge into a number.
Now look at what amplification does. It raises the signal values, and with them the noise floor. But the top of the range stays fixed, set by the ADC. The highest value you can record stays the same while the lowest one goes up, so the range between them shrinks. In other words, you lose dynamic range when you raise the ISO. That’s bad for astrophotography, where nearly every image has dynamic range challenges: faint nebulosity next to bright stars, for instance.
You lose dynamic range when you raise the ISO, and that’s bad for astrophotography.
ISO and unity gain
Unity gain (one electron per ADU) often comes up when people discuss the best ISO. But it only matters if you want to capture very faint signal with just a few exposures. In every other case it doesn’t, and you certainly don’t want to choose it if it costs you dynamic range.
1/3 and 2/3 ISO stops
Most cameras let you change ISO in 1/3 stops. Don’t use those for astrophotography: always use full ISO stops. The in-between settings are made by scaling the image digitally. For a 1/3 stop like ISO 125, the camera uses the analog amplification of ISO 100 and scales the result up to match ISO 125. For a 2/3 stop like ISO 160, it uses the next full stop, ISO 200, and scales the result down.
You’ll find articles recommending the 2/3 stops for their better SNR. But for astrophotography you want to be in the range where your ISO already gives the best SNR, and you don’t want any digital scaling, which loses information. Stick to the real ISO stops: 100, 200, 400, 800, 1600, 3200 and so on.
Summary of ISO considerations
Let’s take a step back and look at what we’ve established:
- ISO has nothing to do with the sensor’s sensitivity.
- ISO sets the amplification of the sensor’s output signal.
- Depending on the camera and the ISO setting, that amplification is analog or digital.
- Raising the ISO lowers dynamic range.
- Raising the ISO improves SNR only until the upstream read noise swamps the downstream read noise.
Points 3 and 5 decide the best setting for your camera. So, counter-intuitive as it is: stop thinking of ISO as a way to make your camera more sensitive or your image brighter. It really, really isn’t.
The best ISO for your DSLR
The best ISO depends on your model, but in general:
The best ISO for astrophotography with any DSLR is the lowest ISO at which either (a) the upstream noise swamps the downstream noise, or (b) the camera switches to digital amplification, whichever comes first.
From that ISO on, read noise stays (more or less) the same: the camera is effectively ISO-less, and raising the ISO gains you nothing while costing dynamic range.
Finding the best ISO for your camera
That’s a clear definition, but what does it mean for your camera?
Unfortunately manufacturers don’t publish the ISO at which a camera switches to digital amplification. What you can find is the read noise at each ISO setting: PhotonsToPhotos has read noise charts for most cameras. (When I first wrote this, I used sensorgen.info, which has since gone offline.) Digital amplification shows up as a (dramatic) rise in read noise at the highest ISO settings, because the downstream noise gets amplified too. So in general, look at the read noise curve, find where it levels off at its lowest values, and use that ISO.
Here’s the read noise of the Nikon D7000 and the Canon 6D. This isn’t meant as a quality comparison, just to show you that the best ISO can differ enormously between models.
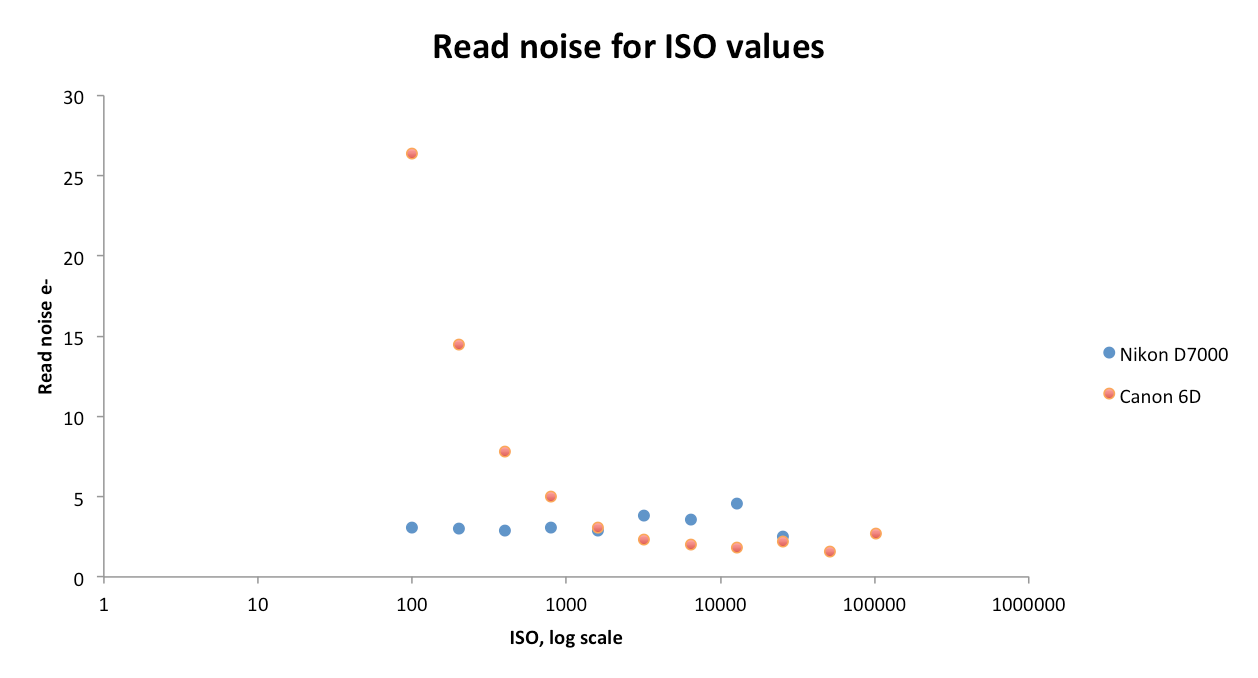
This graph shows why there’s so much debate and confusion about ISO! From it, I’d say ISO 1600 is best for the Canon 6D, while ISO 100 (!) or 200 is best for the D7000. Test it yourself to be sure, but at least the graph tells you what to test: there’s no point trying the 6D at ISO 100, or the D7000 at ISO 1600.
Conclusion
This topic is complicated, and it doesn’t help that we have to work with numbers manufacturers don’t publish. I’ve simplified things (a lot) in places to give an explanation you can follow without diving into the maths or a lot of side research. In short: find the ISO where your camera’s read noise stops improving, use that full ISO stop, and leave the brightening to processing.